Connecting to GitLab (Tutorial): Difference between revisions
Lucasadmin (talk | contribs) |
Lucasadmin (talk | contribs) No edit summary |
||
| (One intermediate revision by the same user not shown) | |||
| Line 83: | Line 83: | ||
More specifically, we are interested in the instructions for pushing an existing repository, which appear towards the end of the page. | More specifically, we are interested in the instructions for pushing an existing repository, which appear towards the end of the page. | ||
< | <pre> | ||
cd existing_repo | cd existing_repo | ||
git remote rename origin old-origin | git remote rename origin old-origin | ||
| Line 89: | Line 89: | ||
git push --set-upstream origin --all | git push --set-upstream origin --all | ||
git push --set-upstream origin --tags | git push --set-upstream origin --tags | ||
</ | </pre> | ||
Since we haven't already configured any other remote repositories for our local repository, we can ignore the command: | Since we haven't already configured any other remote repositories for our local repository, we can ignore the command: | ||
< | <pre> | ||
git remote rename origin old-origin | git remote rename origin old-origin | ||
</ | </pre> | ||
To indicate to our local repository the address of the remote repository, we run the following command in our command prompt. | To indicate to our local repository the address of the remote repository, we run the following command in our command prompt. | ||
| Line 159: | Line 159: | ||
[[File:Connecting_to_Gitlab_27.png|500px|center]] | [[File:Connecting_to_Gitlab_27.png|500px|center]] | ||
[[Category: Tutorials]] | |||
[[Category: Git]] | |||
Latest revision as of 14:30, 19 November 2024
Configure the SSH client on our PC
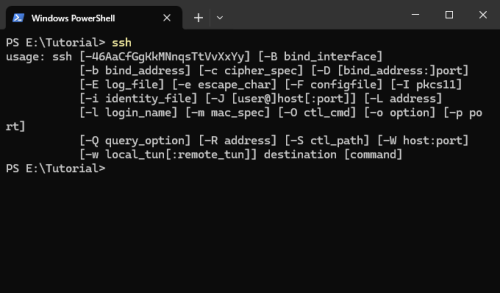
In order to connect to a Gitlab server, we will use SSH. First of all, you should check if SSH is installed on your system (if you are using either a GNU/Linux distribution or a modern Windows or Mac version, it should be installed by default). If typing ssh on your command line does not produce an output similar to this one, contact your IT administrator in order to get an SSH client installed on your machine.
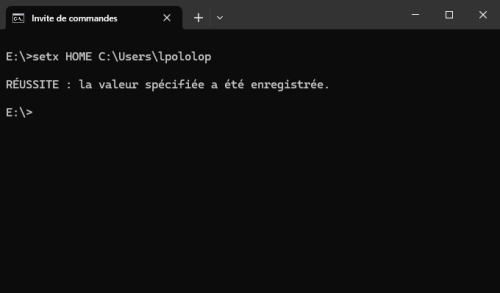
If you are using Windows, in order to prevent potential issues with the SSH configuration, it is recommended to guarantee that an environment variable called HOME points towards you personal folder. This can be achieved by means of the command setx. It should be noted that the path C:\\Users\\lpololop should be replaced by the path towards your personal folder on your own machine.
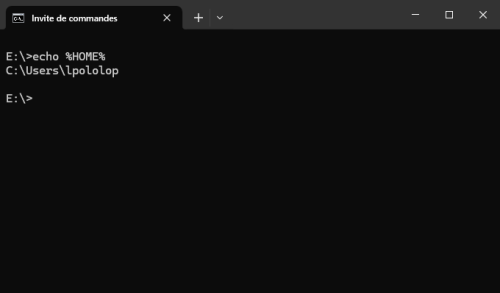
Once that this has been done, in order to check that the environment variables has been correctly set, we will close and open again the terminal, and we will use the command echo. If the variable has been correctly set, the specified path should be displayed.
To identify ourselves when connecting to the server we will not use an username and password, but instead we will use a pair of public/private keys. This is not only safer, but it will also free us from the hassle of having to remember a password.
If you have already used SSH in the past, it may occur that you already have a pair of keys on your systems. They will typically be on a folder called .ssh on your personal directory. In the case of this example, the path would be C:\\Users\\lpololop\\.ssh. Before doing anything else, it is worth checking if you already have a pair of files in this directory called "id_ed25519" and "id_ed25519.pub" (these are the default names for files containing private a public keys following the EdDSA25519 scheme, which is the recommended option).
If this is not the case, you can generate these keys yourself using the command ssh-keygen. You will be prompted to indicate a directory and a file name to store your keys (you can leave the default values) and to specify a passphrase for the key (not mandatory).
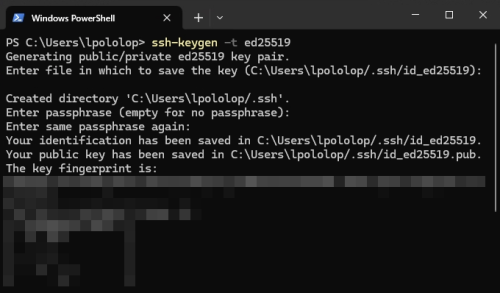
After this operation, you can go to the specified directory and verify that the two files have been created.
Configure you public SSH key in GitLab
Now, we will indicate to GitLab our public key so that it recognizes our PC when Git tries to connect via SSH. We will access to the web interface of our GitLab instance, and login via username and passwords (depending on our instance, a two-factor authentication may be required).
Once that you are logged in, click on your profile picture that is located on the top left corner. Please, be informed that this left pane might be hidden, but it should display once that you place your cursor on the top left corner of the screen.
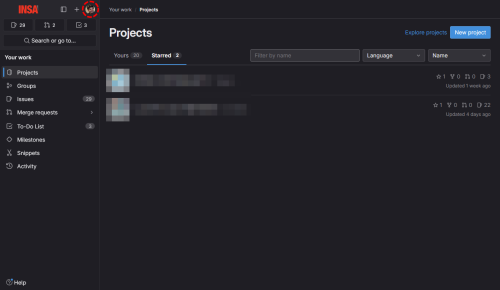
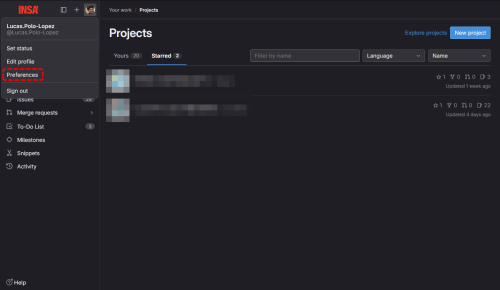
In the menu that unfolds, select "Preferences".
Now the menu in the left pane has changed, and you can choose the option "SSH Keys".
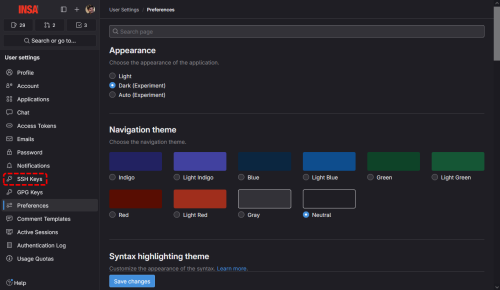
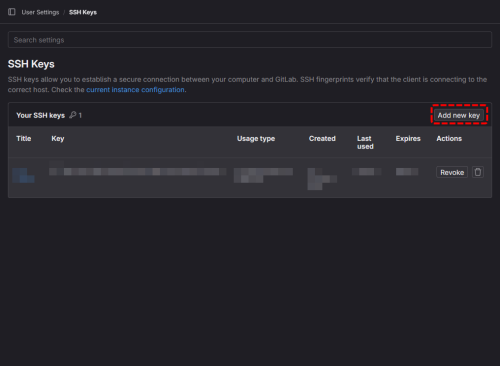
You will be presented with the following screen, where any previously configured keys will be displayed. If this is the first time that you are configuring a SSH key, there should be no previous keys. Click on the "Add new key" button.
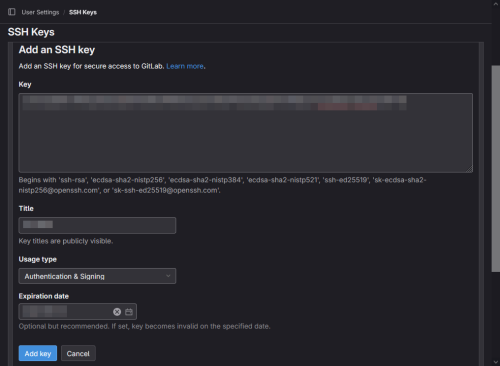
Now it is the moment to locate the file id_ed25519.pub file that you generated in the previous step. Open it with any plain text editor like Notepad++ (Windows) or Gedit (GNU/Linux). Please, avoid using rich text editors like Microsoft Word or others. This file should display a bunch of alphanumeric characters. Copy the contents of the file as they are into the filed "key" of the form that is displaying in your web browser.
CAUTION: It is of extreme importance to open the file id_ed25519.pu, and not the file id_ed255519 without any extension. The file with the .pub extension contains your PUBLIC key, which is to be distributed to others (i.e. users or servers) to communicate with your computer. The file without the extension contains your PRIVATE key, which will be used by your computer to prove its identity. This private key **should not be distributed to anyone**. Shall this happen, other computers could impersonate your computer.
In the "Title" field you can type any name that will help you to identify the computer for which you are configuring the access (e.g. "Professional laptop").
Check that the option "Authentication & Signing" is chosen for the field "Usage type". You can specify an expiration date for this key, which will obligate you to renew the key passed that date.
Finally, click the "Add key" button at the end of the page.
Create a new repository in GitLab
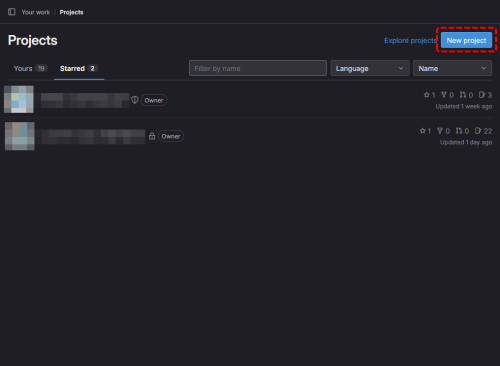
Now we will create a repository in our GitLab account to upload the repository that wee have created locally. First, come back to your list of projects. You can do so by clicking on the logo of your GitLab Instance which appears on the left panel.
Then, you can click on "New project".
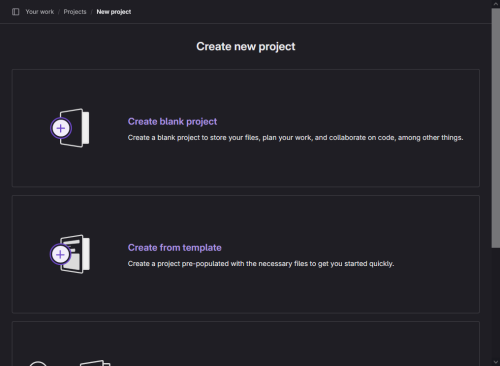
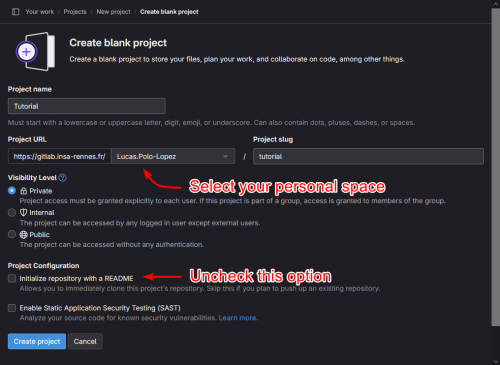
In the following page, choose the "Create blank project" option.
You will need to specify a name for the repository (Project name). In the Project URL section, you must choose your personal space in the collapsible menu (there are other options, but we will see them in future tutorials). The end of the URL (Project slug) is automatically filled from what you put in the Project name. Nevertheless, you may edit it to your convenience if you wish.
Whenever you create a repository you must adjust its visibility level, to define who will have access to it. For this tutorial, choose "Private".
Finally, under "Project Configuration", uncheck the option" Initialize repository with a README". If this options is left checked, the repository will be initialized with a existing initial commit, which will prevent us from uploading our local repository.
Finally, click on the "Create project" button to confirm your options.
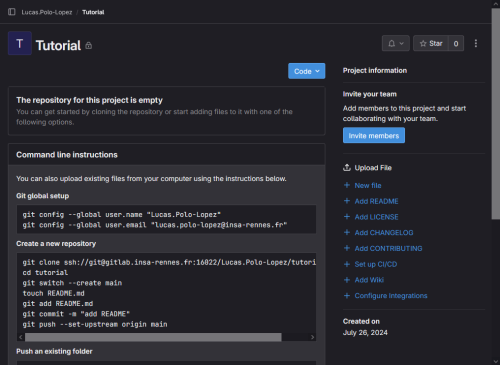
You will be redirected to the page of your newly created repository. Since the repository is empty, no files are shown for the moment. The page also shows some instructions that you can follow to upload files to it.
Uploading our local repository to the server
More specifically, we are interested in the instructions for pushing an existing repository, which appear towards the end of the page.
cd existing_repo
git remote rename origin old-origin
git remote add origin ssh://git@gitlab.insa-rennes.fr:16022/Lucas.Polo-Lopez/tutorial.git
git push --set-upstream origin --all
git push --set-upstream origin --tags
Since we haven't already configured any other remote repositories for our local repository, we can ignore the command:
git remote rename origin old-origin
To indicate to our local repository the address of the remote repository, we run the following command in our command prompt.
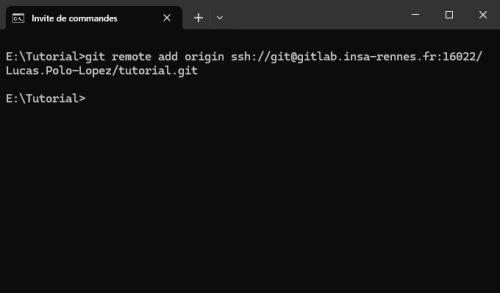
If the command succeeds, there will be no output in the console.
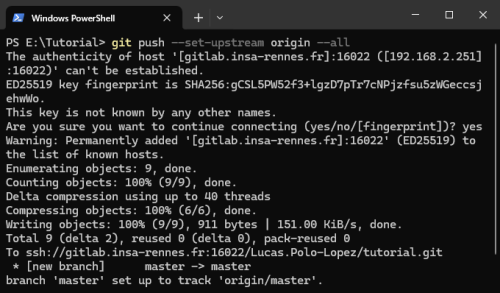
Then, to send our local copy of the repository to the server, we use the command git push.
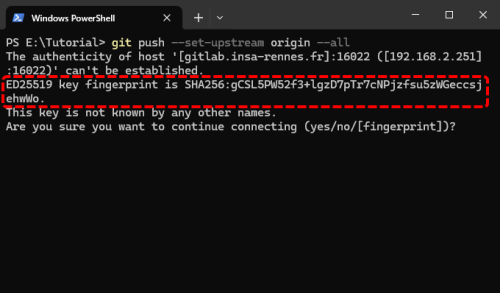
The first time that we run this command, the public SSH fingerprint of the server will be displayed. You can check that it effectively corresponds to the fingerprint of your server by following this link: https://gitlab.insa-rennes.fr/help/instance_configuration Please, take into account that you need to replace "gitlab.insa-rennes.fr" with the address of your GitLab server.
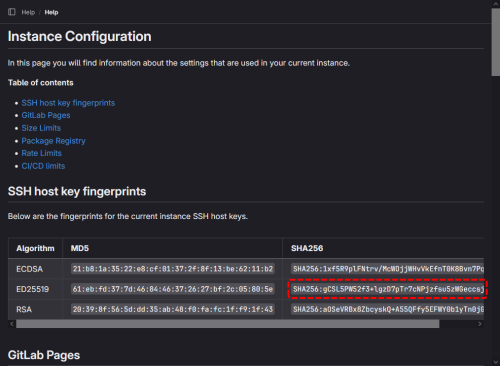
After checking that the displayed fingerprint (console) corresponds to the expected one (web page), we can type yes. The SSH client in our PC will save this fingerprint to avoid us having to check this in the future. Then, the push operation will begin and the contents from out local repository will be uploaded to the server.
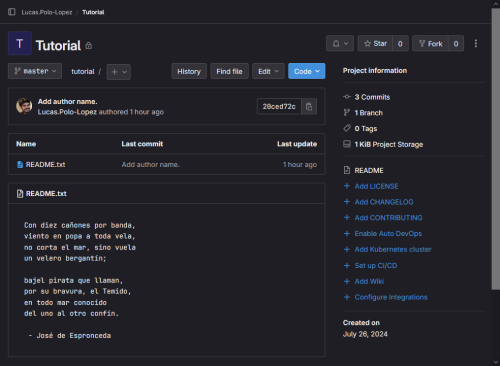
If we now come back to the page of our repository, we will see that the uploaded content is displayed.
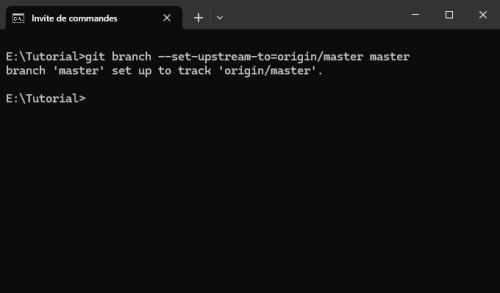
In order to establish a link between the local and remote "master" branches, we need to execute the following command. This will avoid that we need to specify to/from which branch we want to push/pull at each operation.
Retrieving modifications from the server
In this section we are going to see how can we update our local copy of the repository when the online repository presents a more recent version. There are two reasons that can lead up to such scenario: - A collaborator pushed a new commit to the server. - We pushed a commit from a different computer. With the idea of keeping things simple, we will avoid the use of several user accounts in this tutorial, and we are going to consider the second scenario.
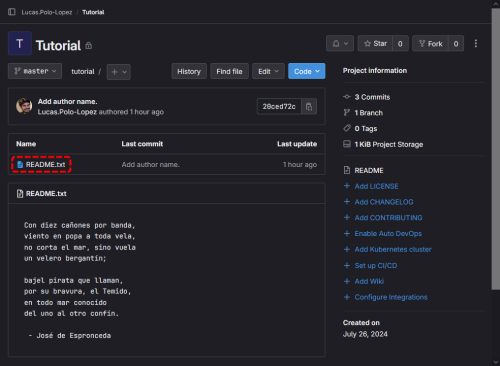
It will not be necessary to have another computer at hand to push a commit to the server, since the web interface of GitLab allows us to edit the files and make commits directly to the online version of the repository. To do so, we will click on the README.txt of our repository.
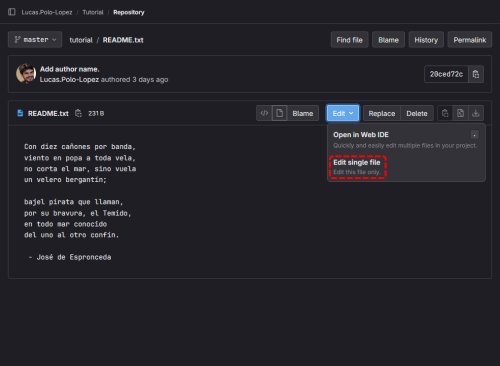
Once that we have opened the file, we click on the "Edit" button, and then choose the option "Edit single file" in the collapsible menu that will open.
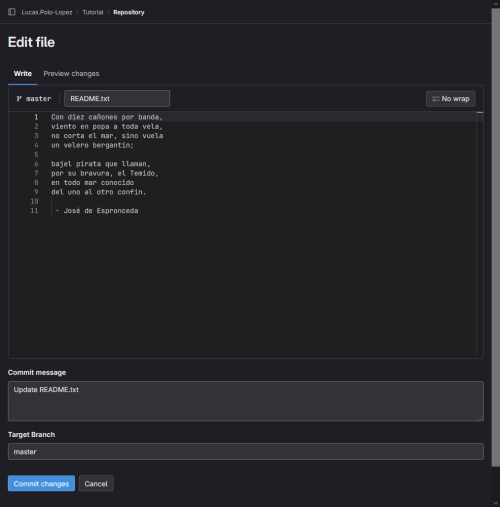
An editor will display in the web browser.
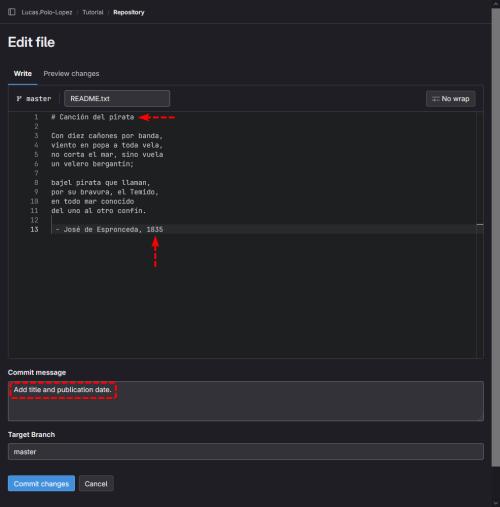
We add the title of the poem (Canción del pirata) and the publication date (1835). Then, we include a descriptive comment in the "Commit message" section and click the "Commit changes" button. This will add a new commit to the repository with the desired changes.
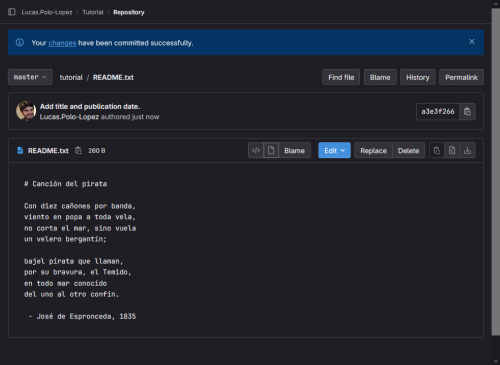
We will be redirected to the view of the file, where a pop-up will inform us that the changes have been successfully committed.
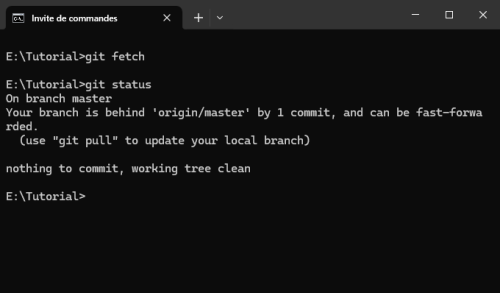
Now the changes have been made to the remote copy of the repository, but no to the local one. We can use the command git fetch to retrieve the notice of any updates on the server. If we now use the command git status we will see that our local copy is not up to date with the remote one.
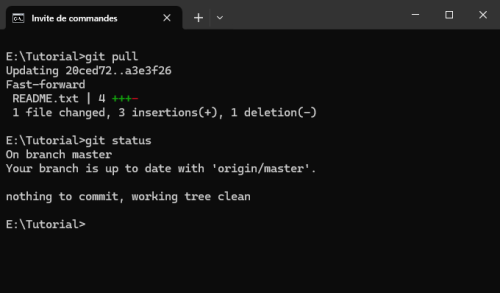
By using the command git pull we can download these modification and update our local copy of the repository. If we check the status of the repository after this operation, we will be informed that our local copy is up to date with the remote one.
Finally, we can check that the local README.txt does indeed contain the modifications that we did to the online file.
