Recommended Software Development Workflow (Tutorial): Difference between revisions
Lucasadmin (talk | contribs) Tag: Reverted |
Lucasadmin (talk | contribs) No edit summary Tag: Manual revert |
||
| Line 47: | Line 47: | ||
After finishing to implement the new feature, we can merge the feature branch to ''develop'' by doing: | After finishing to implement the new feature, we can merge the feature branch to ''develop'' by doing: | ||
<syntaxhighlight lang=" | <syntaxhighlight lang="bash"> | ||
git checkout develop | git checkout develop | ||
git merge --no-ff new-feature | git merge --no-ff new-feature | ||
| Line 70: | Line 70: | ||
The creation of a release branch is done in the same way as a feature branch: | The creation of a release branch is done in the same way as a feature branch: | ||
<syntaxhighlight lang=" | <syntaxhighlight lang="bash"> | ||
git checkout -b release-4.2.0 develop | git checkout -b release-4.2.0 develop | ||
</syntaxhighlight> | </syntaxhighlight> | ||
| Line 78: | Line 78: | ||
Once completed, the release branch is merged to ''main'': | Once completed, the release branch is merged to ''main'': | ||
<syntaxhighlight lang=" | <syntaxhighlight lang="bash"> | ||
git checkout main | git checkout main | ||
git merge --no-ff release-4.2.0 | git merge --no-ff release-4.2.0 | ||
| Line 86: | Line 86: | ||
Adding a tag will facilitate localizing the release in the project history. After merging to ''main'', it is also necessary merging to ''develop'': | Adding a tag will facilitate localizing the release in the project history. After merging to ''main'', it is also necessary merging to ''develop'': | ||
<syntaxhighlight lang=" | <syntaxhighlight lang="bash"> | ||
git checkout develop | git checkout develop | ||
git merge --no-ff release-4.2.0 | git merge --no-ff release-4.2.0 | ||
| Line 93: | Line 93: | ||
Now, the release branch can be deleted: | Now, the release branch can be deleted: | ||
<syntaxhighlight lang=" | <syntaxhighlight lang="bash"> | ||
git branch -d release-4.2.0 | git branch -d release-4.2.0 | ||
</syntaxhighlight> | </syntaxhighlight> | ||
| Line 121: | Line 121: | ||
The creation of the hotfix branch is achieved in the same way as we have done for other types of branches. The only difference to take into account is that in this case the branch is created from ''main''. | The creation of the hotfix branch is achieved in the same way as we have done for other types of branches. The only difference to take into account is that in this case the branch is created from ''main''. | ||
<syntaxhighlight lang=" | <syntaxhighlight lang="bash"> | ||
git checkout -b hotfix-4.2.1 main | git checkout -b hotfix-4.2.1 main | ||
</syntaxhighlight> | </syntaxhighlight> | ||
| Line 129: | Line 129: | ||
Once completed, the hotfix branch is merged to ''main'': | Once completed, the hotfix branch is merged to ''main'': | ||
<syntaxhighlight lang=" | <syntaxhighlight lang="bash"> | ||
git checkout main | git checkout main | ||
git merge --no-ff hotfix-4.2.1 | git merge --no-ff hotfix-4.2.1 | ||
| Line 137: | Line 137: | ||
As with the release branch, we add a tag to facilitate localizing the hotfix in the project history. Once again, after merging to ''main'' it is also necessary merging to ''develop'': | As with the release branch, we add a tag to facilitate localizing the hotfix in the project history. Once again, after merging to ''main'' it is also necessary merging to ''develop'': | ||
<syntaxhighlight lang=" | <syntaxhighlight lang="bash"> | ||
git checkout develop | git checkout develop | ||
git merge --no-ff hotfix-4.2.1 | git merge --no-ff hotfix-4.2.1 | ||
| Line 146: | Line 146: | ||
Finally, the release branch can be deleted: | Finally, the release branch can be deleted: | ||
<syntaxhighlight lang=" | <syntaxhighlight lang="bash"> | ||
git branch -d hotfix-4.2.1 | git branch -d hotfix-4.2.1 | ||
</syntaxhighlight> | </syntaxhighlight> | ||
Revision as of 11:14, 19 November 2024
In the tutorial about branches in Git we showed how to create, modify and merge branches. We strongly recommend you to follow that tutorial before (if you haven't already) before continuing with the present one. Here, we will illustrate how to put the use of branches to practice in order to create an efficient development workflow.
WARNING!: As a researcher you may be tempted to think that the techniques described here are too constraining. You may argue that you need freedom to "try out crazy stuff" with your code, and that you do not have the time to waste with all this overcharge of branches and development workflows. You could not be more wrong. The fact of following a systematic workflow does not limit in anyway the "craziness" of your code experiments. When we do an experiment in the laboratory we normally thought and design the experiment beforehand, and we follow well-defined procedures to guarantee the repeatability of the experiment and document its results. The objective of this development workflow is to employ the same level of rigour when we do coding "experiments". We should not see the use of a development workflow as an useless overcharge, but as a methodology to obtain reliable and stable code that provides repeatable results. Our lemma should be: "Think twice, code once".
Why use several branches?
One may be tempted to use a single branch for its project. After all, Git allows us to establish a log of our progress so, if we run into problem, we could always roll back to a previous version, right?
Despite possible, this is an extremely bad idea for three important reasons.
First of all, branches allow you to test new features and modifications of your code without modifying your latests stable version. If you want to implement a new functionality, you can create a new branch, code whatever you need and test the new features. Once that you are sure that the feature is correctly implemented, you can merge this branch to the main one, in order to incorporate the new functionality to the stable version of your code. During the development of the new feature (which could potentially take several days or even weeks), you (and other users of your code!) will always have available a working and stable version of the code, without all the "in progress" modifications.
Secondly, by following this approach, revising the code history in the future will be much easier, since commits related to the implementation of each of the functionalities will be grouped together in branches. This can be powered up by using GitLab's tools to plan the development of the code. Doing so will allows you to document the development process of your code, which will simplify finding where is the error when a bug appears (because bugs do always appear). A tutorial on this topic can be found here.
Finally, branches also enable collaborative development. When several persons work on the same project, each one will implement their modifications on a branch of their own. Once that the modification is implemented, it will be merged to the main branch, to share it with other participants. By using branches, concurrent developers can work on the same project without the modifications of one of them affecting the others. You may argue that you are the only developer of your programming projects. Nevertheless, you should not forget that Git is not restricted to source code projects. In fact, you can use it for any text-based project, which means that you can also use it to write papers or reports, which is a task that is commonly done in group.
Types of branches
Main and Develop
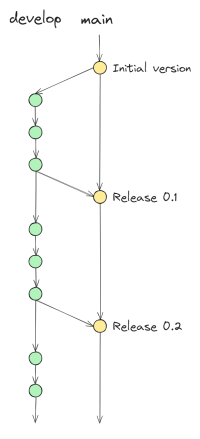
The repository holds two branches with infinite lifetime: main and develop. They are considered to be the two principal branches of the repository.
Each commit in the main branch should correspond to a new release of the code. This means that at each commit, the branch presents a stable state of the code.
The develop branch is in charge of gathering all the new features that we implement. Once that it reaches an stable state, it is merged to the main branch to create a new release.

Feature
Feature branches do always branch from develop and must merge back into develop too. These branches are used to implement a specific feature (e.g. creation of a new class, modification of a method, ... ). A feature branch only exists as long as the feature is in development. Once that the feature has been implemented and tested, the branch must be merged to develop and deleted afterwards. Please, note that this deletion does by no means suppress the contents of the branch from the repository since, after the merge operation, they reside in the develop branch.

Creation of a feature branch
A feature branch be easily created by issuing the command
git checkout -b new-feature developIncorporation of a finished feature
After finishing to implement the new feature, we can merge the feature branch to develop by doing:
git checkout develop
git merge --no-ff new-feature
git branch -d new-feature
git push origin develop
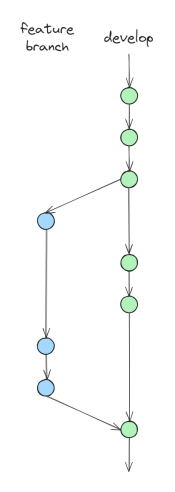
The reason to use the --no-ff option when performing the merge operation is that, by doing so, we for the creation of a new commit, even if the merge could be performed by a "fast-forward" operation. You can see the difference between both scenarios in the figure below.
As it can be observed, using the --no-ff option allows to keep the a trace of the existence of the branch after its deletion. This simplifies enormously revising the project history and reverting the feature if necessary.
Release
Release branches branch from develop and merge back into develop and main (both of them!).
A release branch is used to support the preparation of a release. Once that the *develop* branch has reached an stable state, we will create a new release branch. At this point, the only kind of changes that can be made to the release branch should be related to documentation of the code or correction of minor bugs. If a new feature is to be developed, this should be done on the *develop* branch (using the corresponding feature branch, of course), and the feature will be published on the next release.
Once that the release branch is ready for publication, it must be merged both to the main and develop branches. Merging to main is kind of evident; however, it might be unclear why is it necessary to merge the branch also to develop. The reason for this is that we are interested in keeping for future releases the minor modifications that we may have implemented in the release branch. The way to do so it to merge these changes to develop. Otherwise, when a new release branch is created (by branching from develop), these modifications will not be present.
Creation of a release branch
The creation of a release branch is done in the same way as a feature branch:
git checkout -b release-4.2.0 developCompletion of a release branch
Once completed, the release branch is merged to main:
git checkout main
git merge --no-ff release-4.2.0
git tag -a 4.2.0
Adding a tag will facilitate localizing the release in the project history. After merging to main, it is also necessary merging to develop:
git checkout develop
git merge --no-ff release-4.2.0
Now, the release branch can be deleted:
git branch -d release-4.2.0A comment about releases
As researchers, we are not so used to think about our software in terms of releases. Normally, we just implement new features for our tools as we need them, but we do not plan these features beforehand, and we do not keep a register of former versions of our software.
Nevertheless, the use of releases can be of extreme utility in a research context. Imagine that you write a paper whose results depend on the use of a software tool that you have developed. Some months later, you receive the response from the reviewers and you need to rework some of the results. However, since the moment that you sent tour original draft, you have made some modifications to your code and, for some reason, now you do not obtain the same results that you did some months ago.
If you have used Git during your development process, you could try to rollback your code until you find a commit for which the behaviour of the code is the same as it was at the time of writing the paper. However, this task can be tedious if you have not created explicit releases for your code, since you will need to check the commits manually, one by one.
You should think about releases as bookmarks which let you to easily tag the state of your code at a certain moment in time. By using them, you can easily register which release produced the results corresponding to a certain paper or report, and easily rollback to it in case that you experience any trouble with future versions of your code.
At the moment of creating a new release, it is strongly encouraged that the code is well tested to guarantee that it does not present bugs. "Testing a code" does not mean "running a couple of example scripts to see if they work", but to systematically try all the possible execution flows for the code. Among others, this includes testing configurations of the input parameters that may not make sense in a "normal" use case. To find out how to automatize the testing of your code you can check out this tutorial.
Hotfix
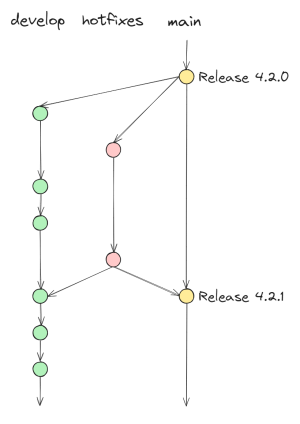
Hotfix branches are the only kind of branch that may branch from main. Once the hotfix is completed, the branch must be merged both to main and develop.
This kind of branches are used to correct immediately an error in the current, already published, release. The idea here is that the development of the project can continue (on the develop branch), while someone works on solving the bug.

Creation of a hotfix branch
The creation of the hotfix branch is achieved in the same way as we have done for other types of branches. The only difference to take into account is that in this case the branch is created from main.
git checkout -b hotfix-4.2.1 mainCompletion of a hotfix branch
Once completed, the hotfix branch is merged to main:
git checkout main
git merge --no-ff hotfix-4.2.1
git tag -a 4.2.1
As with the release branch, we add a tag to facilitate localizing the hotfix in the project history. Once again, after merging to main it is also necessary merging to develop:
git checkout develop
git merge --no-ff hotfix-4.2.1
It should be noted that here there is an exception. If a release branch does exist at the moment of merging the hotfix branch, then the hotfix branch should be merged to the release branch instead of develop. Doing so will eventually result in the changes of the hotfix being integrated into develop, once that the release branch is completed. If we do not merge the hotfix branch to the release one, then we will have a conflict when we try to merge the release and main branches.
Finally, the release branch can be deleted:
git branch -d hotfix-4.2.1A reflection on hotfix branches
It can be questioned whether hotfix branches are needed in the context of a research project.
If your code does not have a large base of users (e.g. only you and a couple of colleagues are using it), you may feel that there is not much urgency to fix the bug that you just found out on your last release. In this case, you may choose to correct the bug using a feature branch, and to integrate the bug correction to your next release. This approach allows you to reduce the complexity of the development workflow by avoiding the use of hotfix branches.
However, if your software is used by a large number of people (e.g. your whole research teams uses it on a daily basis), it could be interesting to solve bugs (specially critical ones) as soon as possible. In this case, the use of hotfix branches in your workflow could be interesting.
References
This workflow was proposed originally by Vincent Driessen. A more detailed description can be found on his blog.